According to research institute IDC, the smart wearable technology market will grow to five times in 2015, and product shipments are expected to exceed 25 million units, and most of them will use Bluetooth. Smart provides users with a seamless, easy-to-connect experience. Future wearables, smartphones, and cloud-based Internet services will work better together without the user having to take any complicated actions or take the time to understand the expertise.
Wearable technology is taking off, and the application forms are changing with each passing day, from smart watches to various sports bracelets and even smart wigs! And Bluetooth Smart is at the heart of all this change. The article covers the basics of building Android Wear experience and extending Android notifications. And continue to discuss with you how to create an app that runs independently on a wearable device.
Android Wear
In 2014, Google launched a new version of Android Wear, an Android operating system for wearables. In general, Android Wear devices like the Moto 360 smartwatch need to work with Android smartphones, while Android Wear supports wearables for two-way communication with other devices running full Android.
Bluetooth Smart architecture and role
In the world of Android Wear, devices are equivalent to nodes, each with different functions and connected to a wearable network. In general, a smartphone is equivalent to the hub of a wearable network and is connected to other types of nodes such as smart watches. Nodes and nodes communicate with each other via Bluetooth Smart, but Android Wear developers don't need to know Bluetooth Smart in their entirety. With the Android Wear API, you can easily and happily implement the Bluetooth technology!
Android Wear APP
You might think that since you can implement a lot of functions by extending the notification, why should you develop an app on a wearable device? Let us start from this issue. By developing Android WearAPP, we have more control over the user interface and a custom UI layout like a smartphone. In addition, two-way device communication is enabled, enabling wearable devices and smartphones to send information to each other.
The Android Wear APP can run independently from the smartphone app, but developers need to pay attention to the relative abilities of smartphones and wearables mentioned in the first article, and use more powerful smartphones to handle complex operations that require multi-party support. For example, continuous scanning of Beacon requires more resources, so it is decided to give this work to the smartphone. After detecting the Beacon, the mobile phone will send the relevant exhibit information to the Android Wear APP on the smart watch, and the user can browse the information on the smart watch screen.
Android Wear API
The Google Play Services library provides the following major Android Wear APIs, which are used in the Wearable Museum Guide app.
DataApi
This API automatically synchronizes all nodes connected to Android Wear, and between the smartphone and the smart watch in the Museum Guide app.
A DataItem object is typically created by the PutDataRequest class to make a specific path to confirm the type of node data received through the synchronization process. Then just call Wearable.DataApi.putDataItem and pass the data to the API synchronization.
The node uses the DataListener interface to receive synchronized data via the onDataChanged method.
MessageApi
MessageApi allows developers to send byte arrays from one node to another. The use of MessageApi is often used as a Remote Procedure Call (RPC) mechanism. The Capability API can be used to discover nodes that understand and process specific types of information. Call Wearable.MessageApi.sendMessage to send information in the Bluetooth connection. The receiving node that implements the MessageListener interface will be called by the onMessageReceived method.
CapabilityApi
The APP can register the function of processing specific types of information in a source file named wear.xml. "Features" are defined by string values ​​that are created by the developer and referenced by the Capability API. The following picture is a wear.xml file created by Xiaobian for the Museum Guide Smartphone app.

Figure 8 – Declaring capabilities in Wear
NodeApi
This API will provide interconnected node access and related information in the wearable network.
Examples of these APIs will be mentioned later in the article.
Android Wear Museum navigation user interface (User Interface, UI)
Here you need a multi-page, interactive UI created with extended notifications as in the first section. The GridViewPager class provides the best foundation for this. When approaching the exhibits, a total of three pages are required: the application title page, the exhibit name page with the "like" feedback button, and the exhibit information page. The screenshot after the APP is completed is as follows:
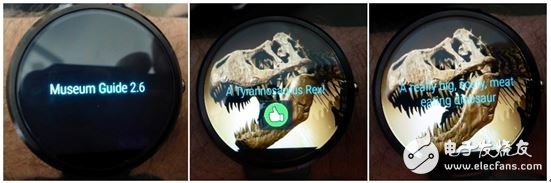
Figure 9 – Screen capture after APP is completed
If there is no Beacon nearby, the wearable app will only display the title page and will not be able to enter the exhibit information page. If the smartphone app detects a nearby Beacon, it will immediately send a photo and profile of the exhibit to the wearable app and display the exhibit information page.
Send exhibit information to wearables
Xiaobian uses the data layer API to transfer exhibit images and information from a smartphone to a wearable device. At the sending end (smartphone APP), use the Asset object to form an image container, and then use the PutDataMapRequest item to start smart watch synchronization. Then use Google Play Wearable DataApi to launch smartwatch sync. Note here that the data PutDataRequest contains a timestamp. Because DataApi buffers the data, it does not require data transfer if there is no change since the last synchronization event.
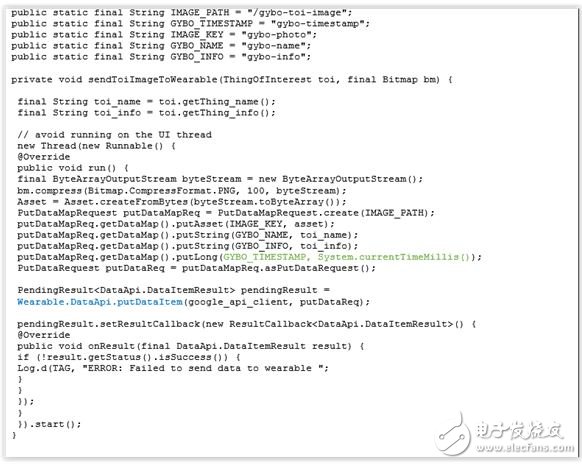
Figure 10 – Smartphone app sends data to wearables using the data layer API
Implement the DataApi.DataListener interface in the Android Wear APP to handle data synchronization events in the onDataChanged method.
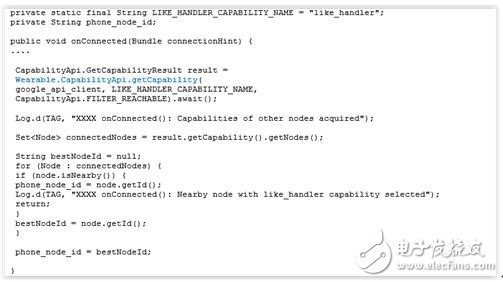
Figure 11 - Using the Capability API
Get the "like" button
Let the wearable app notify the smartphone app immediately after the user presses the "like" button and use the Message API to complete this step. In addition, the Capability API is used to ensure that information is selected for smartphone nodes.
Figure 12 – Using the Capability API
When the user presses the "like" button, it will send a message containing the path, which means "this event is treated as "press the like button", and also contains the name of the exhibit, etc., this information Sent to the smartphone app by the wearable app.
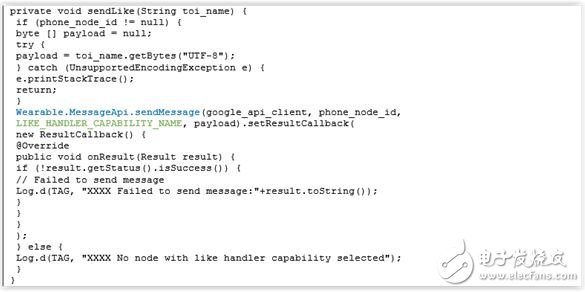
Figure 13 – Sending information from a wearable device to a smartphone via the information API
The MessageApi.MessageListener interface in the smartphone app receives information by calling the onMessageReceived method.
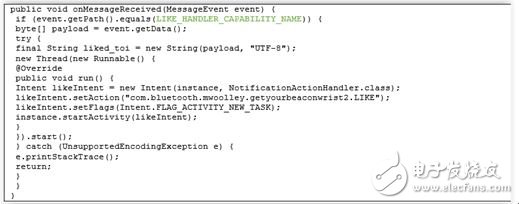
Figure 14 – Smartphone app receives information from the wearable device APP
to sum up
The Android Wear API in the wearable network plus the low-power wireless transmission between the nodes of Bluetooth Smart, Android Wear is fun!
In other words, Android Wear allows developers to directly use the standard Bluetooth Smart API like android.bluetooth.le.BluetoothLeScanner. This way, the wearable device can interact directly with other Bluetooth Smart devices without the assistance of the phone.
Wearables have far fewer features than smartphone hubs, so wearables often work with smartphones to take some difficult computing tasks to the smartphone. In this article we will focus on such usage scenarios.
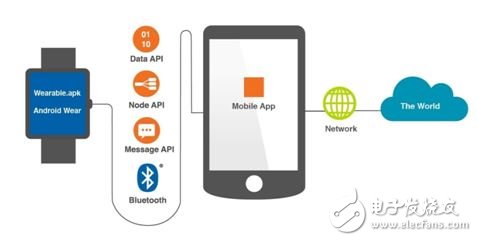
Figure 1 – Architecture
Three ways to develop a wearable museum guide app
There are three ways to extend the previously introduced Smartphone Museum Guide app to the Moto 360 Smart Watch:
1. Use standard Android NoTIficaTIons
2. Use Extend NoTIficaTIons for Android Wear devices
3. Develop Android WearAPP running on wearables
This article first introduces you to the first two notification-based methods, and then introduces the development of Android Wear APP.
Standard Notifications
Tell you a good news: any notifications from your Android smartphone will be automatically sent to the appropriate connected connected device. Therefore, if the notification has been used on the Android smartphone app, even if the special code is not written separately, the APP notification is not a problem on the wearable device, cool!
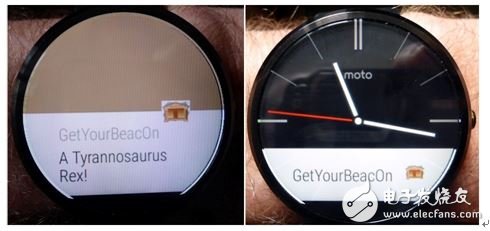
Figure 2 – Standard Notification for the GetYourBeacOn Application on Moto 360
Extension notice for wearable devices
The Android API provides some means to customize the information for the wearable device, rather than simply using the wearable device as a display for the smartphone notification prompt. For example, we can use special text styles to set the background image of the notification, create multiple pages to allow users to view the notification details by swiping the screen, and add some actions to the notification to increase the interactivity of the wearable device.
I decided to provide users with multiple information pages on the Android Wear device, and then add some interactions so that users can make "like" or "dislike" feedback on specific exhibition content. This is not difficult to achieve, just use a tool called WearableExtender. Let's take a brief look at the code.
Let's start by creating three main exhibition information pages. To make it easier for users to read information on wearable devices, we can use text form.
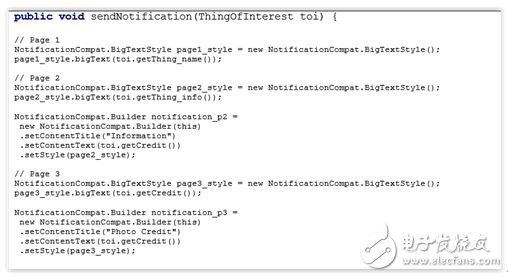
Figure 3 - Creating a Notification Page
Next we need to create an Action object in response to the user's choice of "like" and "dislike" interaction options. The Action is similar to the page, but requires an Intent associated with it to be included in the PendingIntent object. In Android, an Intent is an operation to be executed, and a PendingIntent is an Intent that can be executed by another application. In this case, the aforementioned "another application" refers to the museum navigation APP, and I specify that the PendingIntent needs to start an Activity called NotificationActionHandler.

Figure 4 – Create action to add interaction to notifications
Finally, we create a WearableExtender that includes additional pages and actions, and then create a notification containing it, plus data representing some basic settings and our first notification page. Trigger notification, it becomes! The wearable device receives a multi-page, interactive notification.
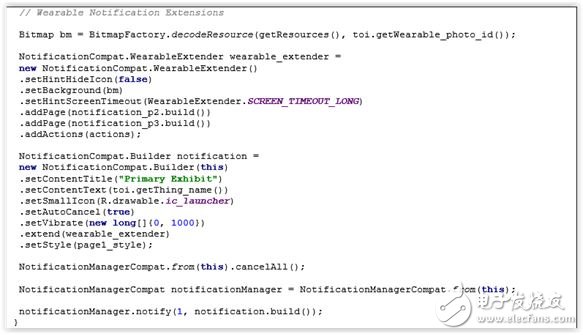
Figure 5 – Adding wearable extensions to notifications
The notification will appear on the smart watch screen as shown below
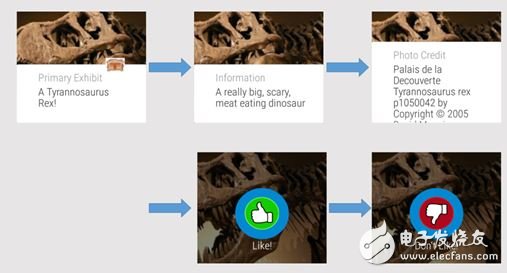
Figure 6 – Extended Interaction Notification on Wearables
When the user selects "like" or "dislike", the NotificationActionHandlerActivity will start on the smartphone and display one of the following screens:
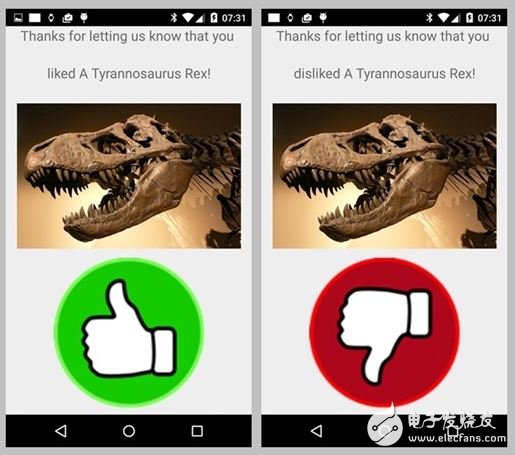
Figure 7 – Smartphone App Response to Selected Actions on Wearables
You see, you can achieve this versatility with Android notifications alone!
Android Wear is still very easy to use. Notification is familiar to most Android app developers. Bluetooth Smart silently helps you communicate between your smartphone and your wearable device behind the scenes, without the developer having to spend too much time learning about it.
If you need a set to offer your fiber optic and its connectors protection, then there may different types of Fiber Optic Terminal Boxes burst into your mind. Optical terminal box(OTB) is mounted to in and out side wall of building or pole to distribute and connect optical cable for distribution of subscriber. It is designed with controls that maintain the fiber bending radius throughout the unit on the segregated customer and provider sides.
Our Fiber Optic Terminal Box series includes cabinet, Fiber Splice Closure , Sliding Rack Mount Fiber Patch Panel, wall mount Distribution Box and fiber optic surface mount box(86*86mm type). They all offer good protection either mechanical or environment to optical fiber and connectors inside. For convenient cable management, they provide termination, splicing and storage functions for Fiber Optic Cable systems.
The main material for our fiber optic terminal box is cold rolled steel with powder coating finished. If you need plastic material to keep light but solid, we have PC material products for your option. Such as our Fiber Optic Splice Closure and surface mounting box.
For different application, you can find our product accordingly. Either outdoor or indoor, either for small capacity or large capacity, either for hanging in the air or bury under the earth, either install on the wall or on the desk, you can always find there is one type suitable to you.
Fiber Optic Terminal Box,For the protective connection and storage between cables and pigtails. Supply reliable cable fixing, stripping, and grounding device; Small cubage, unique structure, easy installation.
If you need a set to offer your fiber optic and its connectors protection, then there may different types of fiber optic terminal boxes burst into your mind. Optical Terminal Box(OTB) is mounted to in and out side wall of building or pole to distribute and connect optical cable for distribution of subscriber. It is designed with controls that maintain the fiber bending radius throughout the unit on the segregated customer and provider sides.
Our fiber optic terminal box series includes cabinet, FDP, Fiber Terminal Box FTB , Fiber Optic Distribution Point Box, wall mount distribution box and fiber optic surface mount box(86*86mm type). They all offer good protection either mechanical or environment to optical fiber and connectors inside. For convenient cable management, they provide termination, splicing and storage functions for fiber optic cable systems.

Fiber Optic Terminal Box
Fiber Optic Terminal Boxes, Fiber Optic Distribution Point Box, Fiber Optic Cable FTTH Termination, Fiber Optic Junction Box, Fiber Access Terminal, Fiber Terminal Box FTB
NINGBO YULIANG TELECOM MUNICATIONS EQUIPMENT CO.,LTD. , https://www.yltelecom.com